My daughter, Tamara, has just turned 8. She had requested (in July, while I was organising my son's party) a Disney themed party to celebrate! Organisations for the party were underway (much, much later than July). I found an awesome Disney font generator site which I used for her party invitations, along with a Disney picture of Tamara's choice on the front. They looked like this:
When the children arrived for the party, I had some 'craft' already set up on the table, which had a purple plastic table cover to be Disney themed: Fairy wands (admittedly, this was a left-over idea from 4FAMILIES), and Scoobie bracelets (which actually proved a bit tricky and wasn't really an interest for the kids anyway)... So, just the fairy wands it was!
There was also a guessing competition! Inside washed and dried baby food jars, I had placed M 'n' Ms and gummy bears. I titled them 'Mickey Mouse droppings', and 'Baby Brother Bears'. Reuben thought the first one was pretty gross, but hey - I don't think the kids actually paid attention to what they were called anyway! With some black cardboard and sticky tape, I cut out mouse ears and put it on top:
Games we played started with 'Pin the hair on Rapunzel'. For this, I printed out a picture of Rapunzel without long hair, and after kicking myself for not buying yellow wool as soon as I saw it at a discount shop, I thankfully found a yellow hula skirt, so with a bit of last-minute improvisation, I tied some of the strands in little bunches, and then snipped them off the skirt... That made Rapunzel's 'hair' to stick on. With names written on paper and taped to the bottom of each bunch, the kids lined up perfectly and waited patiently for their turn at the game! Rapunzel ended up with hair everywhere :)
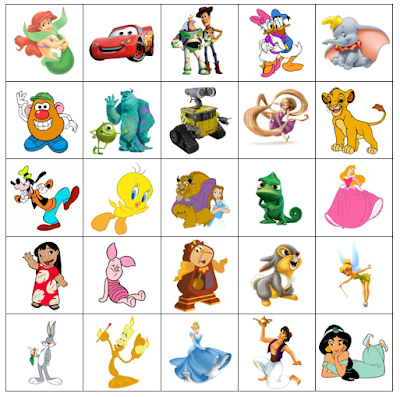
Next up was Disney Bingo! This was the whole reason Tamara wanted a Disney themed party! As I was designing bingo cards for Ben's Pokémon party earlier this year, Tamara had already decided that she wanted me to make Disney bingo cards so that Bambi could be on them! ... I had fun making these, actually, even though there were so many Disney characters to choose from! It was hard to round it down to just a couple of handfuls... Again, a small plastic cup filled with smarties were used for counters. Here's what one of the cards looked like:
I used the Disney font site to make the names of the characters, to hold up as the game was played. I think this is one of my favourite parts of parties - when all the children sit quietly and patiently, waiting for their chance to scream out 'Bingo' if they had a row of smarties on their cards, or 'DISNEY' if they had filled the whole page with smarties... And then of course eat them :)
We then played a bowling game with a small ball and little army figures (like from Toy Story) but I did not have a chance to photograph in between balls rolling everywhere and army men to straighten up for the next go.
For lunch, the kids made their own pizzas! Prior to the party, I cut up squares of baking paper to write the kids' names on them so that they didn't all get mixed up in the oven.
Ingredients came out, pizza bases were ready (i.e. defrosted), names were written - it was time to get some pizza making skills happening! The kids really liked this, and they were patient waiting for sauce, and shared the ingredients so beautifully. Many points for my husband who organised how to fit so many pizzas into the oven at one time!

I over estimated how much ham, pineapple and cheese that would be needed, so there was enough left for my husband and I to make pizzas as well... And potentially we will be making pizzas for the next few days, too :)
- Shortbread cars with mini Oreo biscuits as wheels (and also mini shortbread cars with brown M 'n'Ms as wheels), both decorated with blue and yellow 'royal icing'.
- Tim Tam traffic lights (with red, orange and green M 'n' Ms attached with melted chocolate)
- Disney cupcakes
With my new found interest in melting chocolate (in snap lock bags in the microwave), I printed out some Mickey Mouse outlines to use for the Disney cupcakes... Purple buttercream icing was piped on top, and then a Mickey outline was placed on top of that.
And just to add a bit of spark, the 'candle' was actually a number 8 shaped sparkler! I did not realise such things existed until I found it.
For some decorations, I cut out (probably too many) cardboard stars to put up around the house and on the front door... I did start painting them with glitter paint (yes, seriously - the things we do for our children!), but after a few I lost a bit of interest, and figured that no one would notice anyway! The glitter painted ones went on the front door anyway, and the others just remained plain white.
As the mother of the birthday girl, I thought I should at least dress up a tiny bit... So with some black cardboard, sticky tape, and a headband, I made myself some Mickey Mouse ears to wear.
Happy birthday sweetheart! :)


No comments:
Post a Comment